Introduction on using Docker for development
docker servers environmentsIn this post I wanna talk about Docker because I think it would be nice to share the knowledge I gained about it. If you search for Docker on google you will find the official website where they are explaining what docker is, so I’ll be talking more about what’s there.
Docker is a wrapper around linux containers.
What is a container?
Maybe you used until now a virtual machine to run your projects and usualy containers are compared against virtual machines. But a container is very different from a virtual machine.
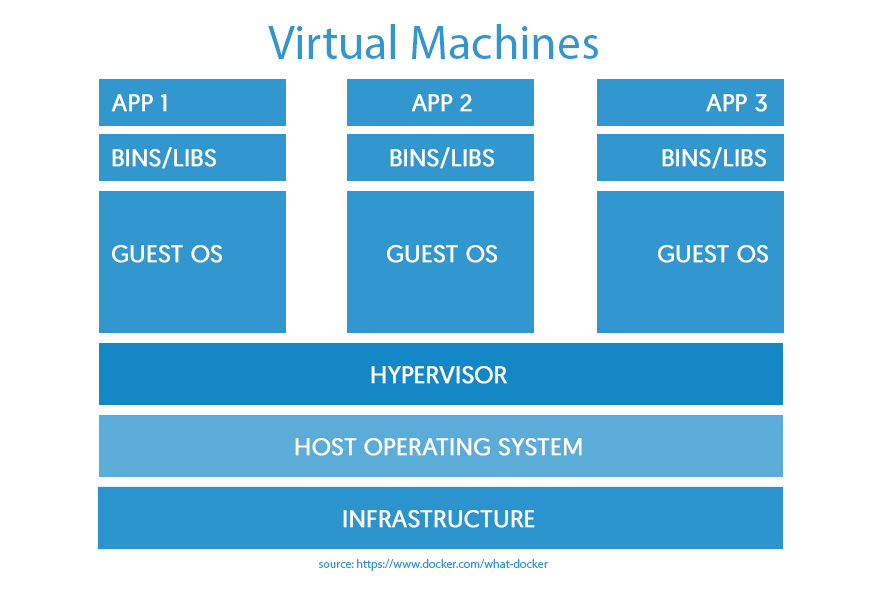
A virtual machine is actualy a tiny computer which is virtually running on your real computer. That hypervisor layer is the one that helps us lie to the virtual machines. The virtual machine thinks it’s an entire computer and that has real hardware. That means that the virtual machine has to do everything a computer has to do. This process it’s very heavy because the virtual machine will take memory, CPU, hard disk space. Each virtual machine contains an entire computer with operating system end everything else.
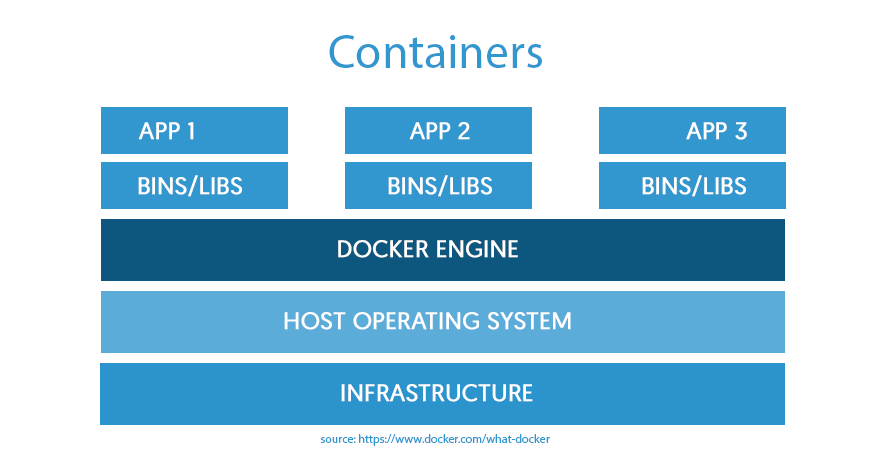
A container on the other hand, will share the linux kernel which means that there isn’t this extra layer of an entire computer that is stored somewhere on your computer so it can run. A linux container contains exactly what it needs to be. For example if I want to create a Debian container, it can sit on top of my linux system and the container will share my linux kernel, doesn’t matter what linux operating system I have installed on my computer, and on top of it will build whatever it needs to build in order for it to be Debian.
So in conclusion a virtual machine is an entire computer, it runs things like networking, cron, syslog everything but a container runs basically only one process.
Why docker?
As you may read on the official docker web page, docker’s commercials solutions provide an out of the box CaaS environment that gives IT Ops teams security and control over their environment, while enabling developers to build applications in a self service way. Docker provide the tooling for organisations to be able to innovate faster, reduce costs and be more productive.
Offers agility
Developers are able to define their own environments. Ops people can deploy applications faster allowing the business to outpace the competition.
Offers control
Developers own all the code of the application infrastructure and are more flexible to update it. Ops people are able to secure, scale and document the environments, while the costs of the organisations are overall reduced.
Offers portability
Docker allows teams and organisations to choose and leverage any infrastructure: cloud, VMs or even their own servers
How to install Docker?
For the latest instructions you should always refer to the official documentation.
How to use Docker?
Now that you have docker installed on your computer it’s time to get to the action… Actually, no! Before you start using docker you have to learn the most useful commands and how you can interact with them. I hope you’ll not be too intimidated of the number of commands I’ll be presenting. Later on, in other posts I’ll use them and it would be good for you to have this intro.
Images and Containers
Docker images
- Defines the template for a container
- Can be pushed or pulled to a repository
- Can be tagged and the default tag is latest
Docker containers
- Is the instance of an image
- Can be started, stopped, inspected etc.
- Can be linked with other containers
How to use Docker images commands
For searching on the registry (docker hub) and find the proper docker image you need, you will use search command.
$ docker search <term>
For downloading or updating an image from the registry you will use the pull command.
$ docker pull <image>
If you want to tag a new image you will use the tag command followed by the image name and the new/same image name and
a tag.
$ docker tag <image> <image:tag>
For uploading an image to the registry so you can use it later you will use the push command followed by the image name.
$ docker push <image>
For listing all of your images you just use the images command.
$ docker images
Docker images consist of multiple layers. Sometimes you’ll have dangling images which are layers that have no
relationship to any tagged images. They no longer have a purpose and consume disk space. They can be located with the
filter flag, -f with a value of dangling=true to the docker images command.
$ docker images -f dangling=true
If you want to remove an image you will use rmi command. -f flag will force delete the image.
$ docker rmi -f <imageID | imageName:tag>
In order to remove all the images you have you can dynamically get the images ids with docker images -q command and
pass the result as an argument to the docker rmi -f command.
$ docker rmi -f $(docker image -q)
If you want to remove the dangling images you could use -q flag and pass the dangling command to the rmi command.
$ docker rmi $(docker images -f dangling=true -q)
You can also check the history of an image with history command followed by the image name.
$ docker history <imageName>
How to run a container in Docker
For starting a new container all you have to do is run an image. You could also pass more arguments to the run command.
$ docker run <image>
Usage
docker run [OPTIONS] IMAGE [COMMAND] [ARG...]
	--name             Give the container a symbolic name
 	-v, --volume=[]    Bind mount a volume
 	-p, --publish=[]   Publish a container's port(s) to the host
 	-e, --env=[]       Set environment variables
 	--link=[]          Add link to another container
 	--restart="no"     Restart policy (no, on-failure[:max-retry], always)
	--rm=false         Automatically remove the container when it exits
 	-d, --detach=false Run container in background and print container ID
	-i, --interactive=false   Keep STDIN open even if not attached
-t, --tty=false    Allocate a pseudo-TTY
How to use Docker containers commands
Listing running containers is as simple as listing your active processes in linux.
$ docker ps
For listing all containers just pass the -a flag to the ps command.
$ docker ps -a
You can also commit an image locally.
$ docker commit -m 'Message' <containerId> <image>
For removing a single container you will use the rm command and the -f force flag, followed by the container id or
name.
$ docker rm -f [containerID | containerName]
Sometimes you want to remove all your containers (running or stopped) so you’ll have to dynamically search for the
container id with docker ps -aq and pass it as an argument to the rm -f command.
$ docker stop $(docker ps -aq)
$ docker rm -f $(docker ps -aq)
If you wanna inspect a container metadata to find out more about it, as: what containers are liked to it, what IP address
the container has, in which network it’s in or what volumes are attached to it, you can always use the inspect command
followed by the container name or id.
$ docker inspect <container>
Dynamically read a specific metadata from the container.
$ docker inspect --format='{{.Image}}' <container>
You can stop a running container with the stop command.
$ docker stop <container>
And off course you could start a stopped container with the start command.
$ docker start <container>
Finally you can kill a docker container with the kill command.
$ docker kill <container>
Tips and tricks with containers
Sometimes we have to name a docker container so we can easily remember it’s name.
$ docker run --name my-nginx nginx
When you want just a one-time-container use --rm flag. What will happen in this case it’s very simple, the container
will start, run and when it finishes to do what it’s meant to do will stop and remove itself.
The -d flag it’s used when you want the container to run in background and finally the -i flag it’s used when you
want to interact with the container from the command line.
$ docker run --rm --name my-nginx nginx
$ docker run -d -p 80:80 --name my-nginx nginx
$ docker run -it -p 80:80 --name my-nginx nginx
To run a command in an existing container we have to use the exec command which will be the most used command for a
developer.
$ docker exec <container> <command>
$ docker exec -it <container> bash
How we can debug containers
Once again the inspect command come in handy.
$ docker inspect <container>
We can read the container logs and see want happening in the container. The issue is you can’t read the logs if the container is stopped. In that case you have to run the container and make it remain running so you could debug it.
$ docker logs <container>
If you wanna copy files from or into docker container you can do that with the cp command.
$ docker cp webserver:/etc/nginx/nginx.conf /media/www/docker/exercise/nginx.conf
$ docker cp /media/work/docker/exercise/index.html nginx:/usr/share/nginx/html/index.html
Dockerfile. What is for?
Docker can build images automatically by reading the instructions from a Dockerfile. A Dockerfile is a text document
that contains all the commands a user could call on the command line to assemble an image.
Docker files support commands in the following syntax: INSTRUCTION argument.
FROM = the base of your docker image
MAINTAINER = person who maintains the file

RUN = run any command
ADD = add stuff to the image
COPY = copy stuff to the image

EXPOSE = expose some ports

CMD = the command or the parameters for ENTRYPOINT

ENTRYPOINT = allows you to configure a container that will run as an executable
ENV = declare some variable
WORKINGDIR = specify the working directory
Short Dockerfile example
FROM ubuntu:16.04

MAINTAINER Iulian Popa

RUN apt-get update \
    && apt-get install -y nginx \
    && apt-get clean \
    && rm -rf /var/lib/apt/lists/* /tmp/* /var/tmp/* \
    && echo "daemon off;" >> /etc/nginx/nginx.conf

ADD default /etc/nginx/sites-available/default

EXPOSE 80
EXPOSE 443

CMD ["nginx"]
This Dockerfile can be build using docker build which will create an automated build that executes the command-line
instructions in succession. The final result will be a new image with a ubuntu 16.04 distribution which will have Nginx
installed and ready to receive requests.
For some best practices on how you should write a Dockerfile you can read Docker best practices
Understanding context in Dockerfile
To add a file from your local machine into the docker image you have to do something like this.
FROM ubuntu:16.04
ADD myfile.txt /var/www
Very simple. However, if you want to add a file from your home directory this wouldn’t work.
FROM ubuntu:16.04
ADD /home/iulianp/myfile.txt /var/www
$ docker build -t blog .
Uploading context 10240 bytes
Step 1 : FROM ubuntu
 	---> 8dbd9e392a96
Step 2 : ADD /home/vagrant/myfile.txt /
Error build: /home/vagrant/myfile.txt: no such file or directory
Note! Best practice: Only place files and directories that you need to add to docker image under the directory where your Dockerfile is in.
Conclusions
This was a crush introduction into docker. In the next posts I’ll be talking about volumes and networks how to run containers and I’ll be using most of the commands presented in this post. I think you’ll like it so stay tuned.
If you liked this post, you can share it on Twitter. Also you can follow me on Github or endorse me on LinkedIn.